|
How To Use FileZilla (FTP Client) |
| This is an easy step by
step tutorial to show you how to use Filezilla. Filezilla is reliable,
fast and easy-to-use FTP, it is also free!! You can download it here! FileZilla http://repo.w3hub.org/FTP%20Client/ Make sure you download the file that says [filename].exe. Take a moment for the images to load. Ok! Now lets get started!! |
|
Step One - Getting Started |
 Once you've downloaded and
installed FileZilla from
here you
need to run the program. Usually by going through the Start menu. Once
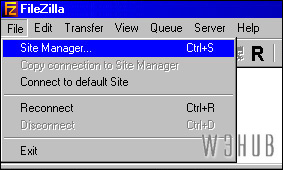
it is open go to Once you've downloaded and
installed FileZilla from
here you
need to run the program. Usually by going through the Start menu. Once
it is open go toFile » Site Manager |
|
Step Two - Customizing |
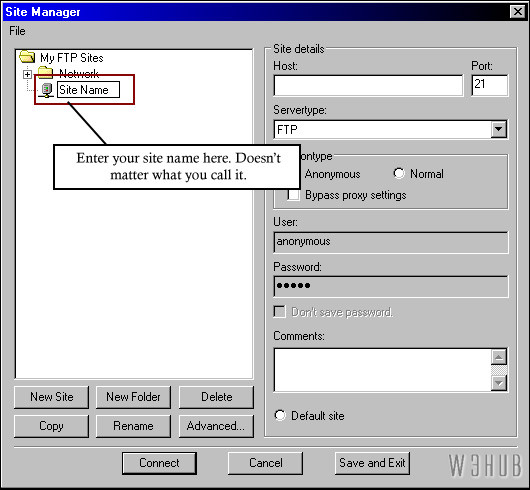 You should now see a window
appear like the one on the right. You should now see a window
appear like the one on the right.First you click on New Site. Then you can type in whatever name you want like My Site or the name of the site for example, Surreal Heaven. |
|
Step Three - Administration |
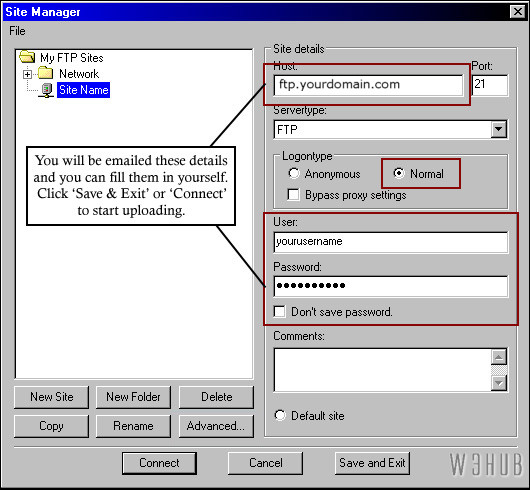 The Host is where you write your
URL without the http:// part. So an example would be
mysite.domain.com. The Host is where you write your
URL without the http:// part. So an example would be
mysite.domain.com. The Username and Password areas can only be accessed if you check the Logon Type as Normal. Your Username is your subdomains name. Your password is the password given to you for your subdomain. All these details will be emailed to you so make sure you keep them just incase. |
|
Step Four - Connecting |
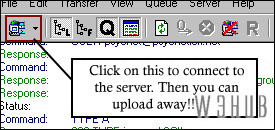 Ok! So you've done all the
administration stuff. Now you can connect and begin to upload. Ok! So you've done all the
administration stuff. Now you can connect and begin to upload.Click on the icon highlighted to connect to the server. Click on the black arrow to choose the site you are going to connect to. |
|
Step Five - Uploading |
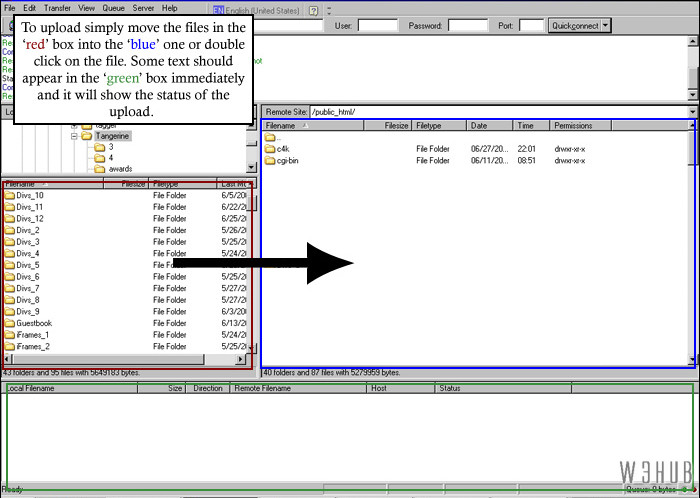 When connected you should come up with something like the above. To upload a file move a file in the red box over into the Blue box. You could also double click on it and it would so the same. Some text should then show up in the Green box. This is to show the status of the download. It also shows the files that are queued to be uploaded. |
|
Step Six - Uploading Cont. |
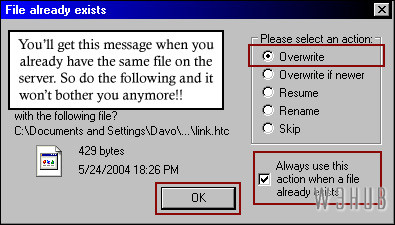 Sometimes you will get the
message above. This is because there is already a file with the same
name on the server. Sometimes you will get the
message above. This is because there is already a file with the same
name on the server.Select the following so that it won't show up again. Then you're all set! |
|
Step Seven - Confirmation |
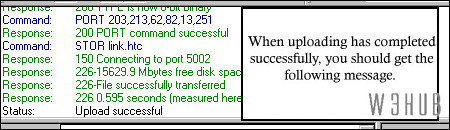 You should get this message at
the very top. You should get this message at
the very top.This is a confirmation to tell you that your upload went well. Now that's all there is to it!! Happy uploading!! |